<?xml version="1.0" encoding="utf-8"?><feed xmlns="http://www.w3.org/2005/Atom" ><generator uri="https://jekyllrb.com/" version="3.10.0">Jekyll</generator><link href="https://dcastares.github.io/feed.xml" rel="self" type="application/atom+xml" /><link href="https://dcastares.github.io/" rel="alternate" type="text/html" /><updated>2026-03-16T15:28:24+00:00</updated><id>https://dcastares.github.io/feed.xml</id><title type="html">Diego Castares - Senior Unity Developer</title><subtitle>Senior Unity Developer specializing in multiplayer &amp; mobile games. Building performance-minded games with Unity, C#, Mirror, and .NET. Remote-ready with US overlap.</subtitle><author><name>Diego Castares</name></author><entry><title type="html">From prototype to production: A low-latency multiplayer stack</title><link href="https://dcastares.github.io/2025/12/15/Multi-region-highly-available-architecture-for-indie-budget.html" rel="alternate" type="text/html" title="From prototype to production: A low-latency multiplayer stack" /><published>2025-12-15T00:00:00+00:00</published><updated>2025-12-15T00:00:00+00:00</updated><id>https://dcastares.github.io/2025/12/15/Multi-region-highly-available-architecture-for-indie-budget</id><content type="html" xml:base="https://dcastares.github.io/2025/12/15/Multi-region-highly-available-architecture-for-indie-budget.html"><![CDATA[<p>When you start working on a real-time multiplayer game, the idea might seem simple, but it can escalate quickly. That happened when we started giving form to Rumble Racer with the Blyts team.</p>

<h2>The challenge</h2>

<p>Rumble Racer is an online multiplayer racing game for mobile that mixes Subway Surfers-style controls with popular arcade racing games. It’s a four-player racing game that ended up being very fun to play.</p>

<p>The challenge was to achieve a production-ready server infrastructure to host worldwide matches, keeping an eye on the infrastructure budget and providing high availability.</p>

<p>In the prototype stage, we choose <a href="https://mirror-networking.com/">Mirror</a> as a networking engine for both matchmaking and gameplay. Mirror was a great match as it was open-source and had a great community on Discord, giving me the ability to extend the library as needed in the long run.</p>

<p>For production, using Mirror for matchmaking in the lobby has its flaws. Mirror runs Unity on a dedicated server and works perfectly, but as the matches add up it starts consuming CPU on the Linux box, requiring more instances and dividing players into batches per server. That limits matchmaking to the players connected to that server.</p>

<p>Also, due to the requirement to support worldwide players, and the low latency needed to keep a smooth real-time experience for everyone, regional servers were required.</p>

<h2>Server architecture</h2>

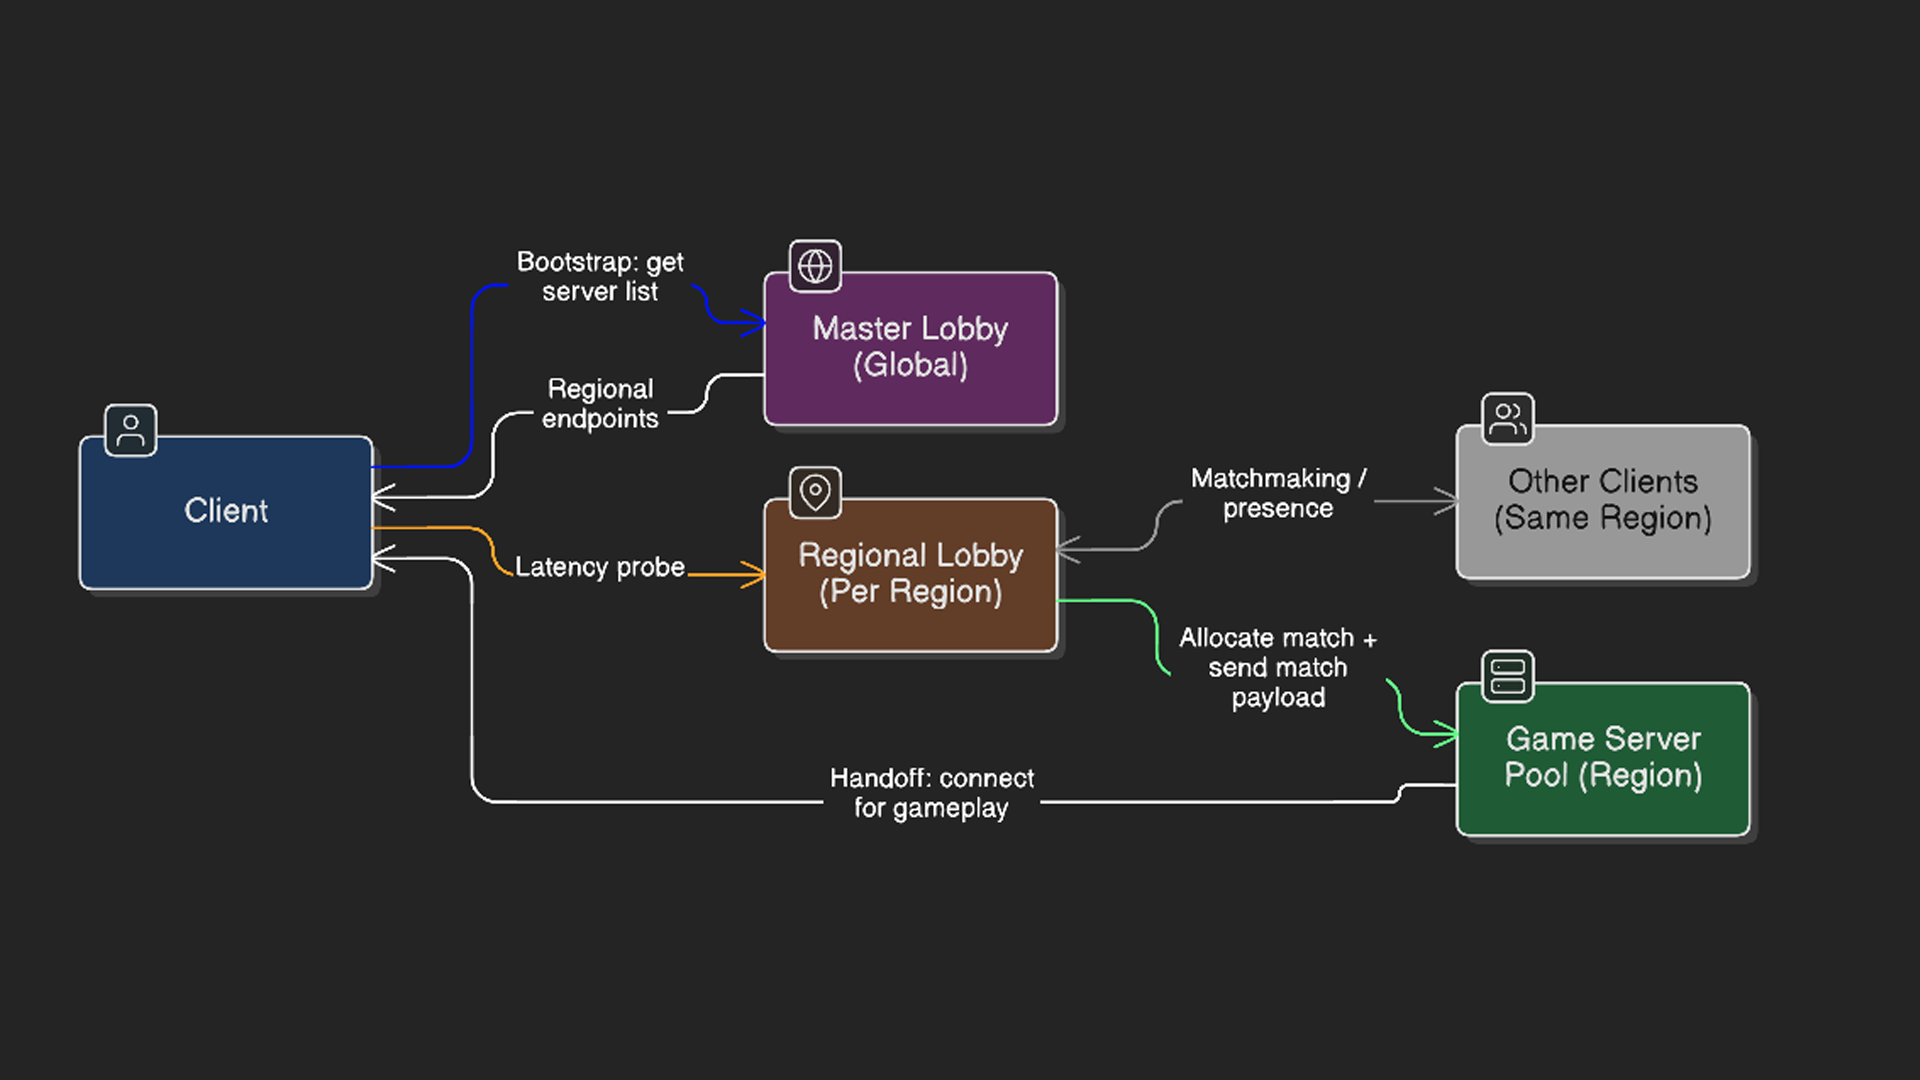
<p>So after some thought, I designed and implemented the server architecture as follows: a .NET lobby server in each region communicating using SignalR, and multiple Mirror servers connected to each lobby server. This provides a high-availability, scalable architecture to support as many players as required, with low latency and region-scoped matchmaking, while keeping Mirror for match simulation, where headless Unity shines.</p>

<p><img src="/assets/rr-architecture.png" alt="server architecture diagram" /></p>

<h2>Final game flow</h2>

<p>The client connects to a master lobby server on start, downloading an updated list of servers. On the first connection, the servers are latency tested, choosing the fastest responder. Once connected, matchmaking takes place on the lobby server with all the players from that region, allowing a seamlessly integrated experience.</p>

<p>When the four players are ready, the lobby server acts as a load balancer, choosing a Mirror server to host the race and sending, via a REST API, the race info and the players’ info, then sharing that server’s details with each player so they can connect and start the race.</p>

<p>All servers are deployed on Linux machines using Docker containers, and we’re ready to add Kubernetes to the mix when traffic requires it, to provide real-time flexibility in the infrastructure.</p>

<p>You can find links to the store and more info about the game in the <a href="/portfolio">portfolio section</a>.</p>]]></content><author><name>Diego Castares</name></author><category term="Other" /><summary type="html"><![CDATA[When you start working on a real-time multiplayer game, the idea might seem simple, but it can escalate quickly. That happened when we started giving form to Rumble Racer with the Blyts team.]]></summary></entry><entry><title type="html">Analyzing Profiler Frames With Ai</title><link href="https://dcastares.github.io/2024/09/12/Analyzing-profiler-frames-with-AI.html" rel="alternate" type="text/html" title="Analyzing Profiler Frames With Ai" /><published>2024-09-12T00:00:00+00:00</published><updated>2024-09-12T00:00:00+00:00</updated><id>https://dcastares.github.io/2024/09/12/Analyzing-profiler-frames-with-AI</id><content type="html" xml:base="https://dcastares.github.io/2024/09/12/Analyzing-profiler-frames-with-AI.html"><![CDATA[<p>Running the Profiler in Unity is a great way to understand what is happening in our game, but when a frame is not performing well, it’s not always obvious why. We have to capture the data, inspect the timeline, and dig through samples to find the culprit.</p>

<p>In day-to-day development, I often want a quick first pass to identify the biggest contributors, spot suspicious spikes or allocations, and decide what to investigate next. That’s where AI can help, by turning a captured frame into a short list of hypotheses to validate in the Profiler. It’s not a replacement for profiling, but it can speed up the initial triage and help you decide where to look first.</p>

<p>The only issue is that when we save Profiler data, we get a binary file that LLMs can’t read directly.</p>

<p>To solve this, I’m using this tool <a href="https://github.com/dcastares/unity-profiler-data-exporter" target="_blank">unity-profiler-data-exporter</a> (a fork from the tool from <a href="https://github.com/steve3003">Stefano Di Palma</a> I fixed to make it work with latest Unity versions) which lets you export a frame from the Profiler as a JSON file. With that, you can talk with your favorite LLM about what is happening in your game.</p>

<h2>Workflow</h2>

<p>Capture the problematic frame in the Unity Profiler.</p>

<p>Export that frame to JSON with unity-profiler-data-exporter.</p>

<p>Paste the JSON (or relevant parts) into your LLM along with a short question, for example: “What are the top contributors, and what should I check next?”</p>

<p>Validate the suggestions back in the Profiler and iterate.</p>

<p>What AI can help you spot quickly</p>

<p>Main thread bound frames vs render thread or GPU bound symptoms</p>

<p>GC allocations and spikes that hint at per-frame allocations</p>

<p>Expensive hotspots like Camera.Render, animation updates, physics steps, or Script.Update loops</p>

<p>Repeated calls or unusually deep stacks that point to a runaway system</p>

<p>Sudden spikes caused by asset loading, instantiation bursts, or expensive one-off work</p>

<h2>Note on privacy</h2>

<p>Profiler captures can contain project-specific details. If you’re working on proprietary code, consider sanitizing the data, removing identifiers, or using a local model before sharing it externally.</p>

<p>If you have comments, questions, or a way to improve it, shoot me an email!</p>]]></content><author><name>Diego Castares</name></author><category term="Other" /><summary type="html"><![CDATA[Running the Profiler in Unity is a great way to understand what is happening in our game, but when a frame is not performing well, it’s not always obvious why. We have to capture the data, inspect the timeline, and dig through samples to find the culprit.]]></summary></entry><entry><title type="html">Redirecting to a different page in Unity WebGL from C# scripts</title><link href="https://dcastares.github.io/2022/08/19/Redirecting-to-another-page-in-Unity-WebGL.html" rel="alternate" type="text/html" title="Redirecting to a different page in Unity WebGL from C# scripts" /><published>2022-08-19T00:00:00+00:00</published><updated>2022-08-19T00:00:00+00:00</updated><id>https://dcastares.github.io/2022/08/19/Redirecting-to-another-page-in-Unity-WebGL</id><content type="html" xml:base="https://dcastares.github.io/2022/08/19/Redirecting-to-another-page-in-Unity-WebGL.html"><![CDATA[<p>When you are building a game, app, or experience using WebGL in Unity, there are chances that you may want to redirect the user to a different page, depending on the flow of your site.</p>

<p>When you are working to publish your app in other platforms than WebGL, or using old versions of Unity, you can just call <a href="https://docs.unity3d.com/ScriptReference/Application.OpenURL.html" target="_blank">Application.OpenUrl</a> and get there.</p>

<p>This changed lately because 99% of the people (that’s a lot) wanted to open a new tab, so according to Unity’s documentation:</p>

<p><i>WebGL: From version 2019.4.25f1, 2020.3.5f1, 2021.1.2f1, and 2021.2.0a11, Application.OpenURL opens url in a new browser tab. In previous versions, Application.OpenURL opens url in the same browser tab, which terminates the running Unity application.</i></p>

<p>So from now on, Application.OpenUrl will open the url in a new tab, with an ugly warning from the browser saying a popup was blocked (but that is another story).</p>

<h2>How to open a URL from WebGL in the same page?</h2>

<p>So if you are between the 1% of the people who is actually looking to redirect the page to another location, this is a possible solution.</p>

<p>We will interact with the scripts in the browser to perform an old good javascript redirect. For that we will have to create a jslib file as is explained <a href="https://docs.unity3d.com/Manual/webgl-interactingwithbrowserscripting.html" target="_blank">in the documentation here.</a></p>

<p>First, you will have to create a folder <b>Plugins</b> under your Assets folder, and there place a text file with the extension “.jslib”. Then open this file and write the following code in it:</p>

<pre><code class="language-csharp">var RedirectPage = {
    openUrl: function(link)
    {
        window.location.href = UTF8ToString(link);
    }
};

mergeInto(LibraryManager.library, RedirectPage);
</code></pre>

<p>And then from your C# code you can use it like this:</p>

<pre><code class="language-csharp">using System.Runtime.InteropServices;

public class ClickHandler : MonoBehaviour
{
    [SerializeField] string url;

    private void OnMouseDown()
    {
#if !UNITY_EDITOR
        openUrl(url);
#endif
    }

    [DllImport("__Internal")]
    private static extern void openUrl(string url);
}
</code></pre>
<p>And that’s it, you can replace the OnMouseDown with any method you need and is ready to go. Hope it helps!</p>

<p>If you have a comment, a question or a way to improve it, shoot me an email!</p>]]></content><author><name>Diego Castares</name></author><category term="Other" /><summary type="html"><![CDATA[When you are building a game, app, or experience using WebGL in Unity, there are chances that you may want to redirect the user to a different page, depending on the flow of your site.]]></summary></entry><entry><title type="html">Warning “Use the new keyword if hiding was intended” in Unity’s MonoBehaviour class</title><link href="https://dcastares.github.io/2022/07/28/Properly-inheriting-Update-Awake-and-Start-methods-in-monobehaviours.html" rel="alternate" type="text/html" title="Warning “Use the new keyword if hiding was intended” in Unity’s MonoBehaviour class" /><published>2022-07-28T00:00:00+00:00</published><updated>2022-07-28T00:00:00+00:00</updated><id>https://dcastares.github.io/2022/07/28/Properly-inheriting-Update-Awake-and-Start-methods-in-monobehaviours</id><content type="html" xml:base="https://dcastares.github.io/2022/07/28/Properly-inheriting-Update-Awake-and-Start-methods-in-monobehaviours.html"><![CDATA[<p>Talking with the team about this warning realized there is a lot of confussion among new Unity developers around how to properly inherit a class that inherits itself from MonoBehaviour and keep the Update, Start, Awake and other parent’s methods working properly (OnEnabled, OnDisabled, LateUpdate, FixedUpdate and so on). When you just use autocomplete to create the methods, in the child class you get a warning saying “Use the new keyword if hiding was intended”, as it assumes you are trying to hide the parent method, but is probably not what the developer is trying to achieve in most cases, so I decided to put a chunk of code here for guidance.</p>

<h2>Code in the parent class</h2>

<p>In the parent class, when you specify the original methods that you intend to extend in the child, you have to specify the keyword “virtual” in the declaration, this way the compiler will know it can be later on overriden in a derived class. 
So let’s supouse we want Update() and Start() working in our child, the code would be something like this.</p>

<pre><code class="language-csharp">
    public class ParentClass : MonoBehaviour
    {
        protected virtual void Start()
        {
            //configuration stuff
        }
        protected virtual void Update()
        {
            //things to do every frame
        }
    }
</code></pre>
<p>That way when you write the methods in the child, the compiler will know you want it to override those.</p>

<h2>Code in the child</h2>

<p>In the child we will simply write the override keyword in the declaration to let the compiler know we want to do so, and if we want to run the code in the parent, just call the original method using base.Method(), or not if you just want to completely override it.</p>

<pre><code class="language-csharp">public class ChildClass: ParentClass
{
    protected override void Start()
    {
        base.Start(); //you can run parent's code at any moment you need to
        //configuration stuff just in the child
    }
    protected override void Update()
    {
        base.Update();
        //things to do every frame just in the child
    }
}
</code></pre>
<p>Of course there are tons of scenarios where a different approach would be better used, but in my experience this work for most cases where you need to extend the MonoBehaviour functionality.</p>

<p>If you have a comment, a question or a way to improve it, shoot me an email!</p>]]></content><author><name>Diego Castares</name></author><category term="Other" /><summary type="html"><![CDATA[Talking with the team about this warning realized there is a lot of confussion among new Unity developers around how to properly inherit a class that inherits itself from MonoBehaviour and keep the Update, Start, Awake and other parent’s methods working properly (OnEnabled, OnDisabled, LateUpdate, FixedUpdate and so on). When you just use autocomplete to create the methods, in the child class you get a warning saying “Use the new keyword if hiding was intended”, as it assumes you are trying to hide the parent method, but is probably not what the developer is trying to achieve in most cases, so I decided to put a chunk of code here for guidance.]]></summary></entry><entry><title type="html">Clicking an object in 2d: Raycast vs OverlapPoint</title><link href="https://dcastares.github.io/2022/06/14/Detect-objects-under-the-mouse-position-in-2D.html" rel="alternate" type="text/html" title="Clicking an object in 2d: Raycast vs OverlapPoint" /><published>2022-06-14T00:00:00+00:00</published><updated>2022-06-14T00:00:00+00:00</updated><id>https://dcastares.github.io/2022/06/14/Detect-objects-under-the-mouse-position-in-2D</id><content type="html" xml:base="https://dcastares.github.io/2022/06/14/Detect-objects-under-the-mouse-position-in-2D.html"><![CDATA[<p>I was integrating a 2D Unity game into a larger project, that was using Raycast to detect what object in the screen the user was clicking on, and the app had the option “Queries Start In Colliders” disabled (in Project Settings&gt;Physics 2D). With this setting disabled colliders don’t work, so following recomendations in the forums, I had to change the implementation to use Physics2D.OverlapPoint instead of Raycast.</p>

<h2>What is the difference?</h2>

<p>While Raycast will send a vector in a given direction and detect what colliders are on the way, OverlapPoint simply uses a point in the screen and checks if there is a collider that overlaps that point.</p>

<p>In terms of performance, even while in 2D may not be that expensive, the team at Unity recommends using the least ammount of raycasts as possible in their <a href="https://learn.unity.com/tutorial/physics-best-practices#5c7f8528edbc2a002053b5b4"> Physics Best Practices document</a>.</p>

<h2>So, is it the same? </h2>

<p>No, it is not. A raycast can be used for many things as you will not always be sending it from the screen to the plane, BUT if you want to specifically detect objects being under the mouse or tap position in the screen, I’m confident that with few tweaks you can change the implementation from one to another with no drawbacks.</p>

<h2>The Code</h2>

<p>So the code to detect our object on click might be something like this:</p>

<pre><code class="language-csharp">if (Input.GetMouseButtonDown(0))
{
    Vector2 touchPosition = Camera.main.ScreenToWorldPoint(Input.mousePosition);
    Collider2D collider = Physics2D.OverlapPoint(touchPosition);
    GameObject gameObjectClicked = collider.gameObject;
    //do what you need to do
}
</code></pre>

<p>If you have a comment, a question or a way to improve it, shoot me an email!</p>]]></content><author><name>Diego Castares</name></author><category term="Other" /><summary type="html"><![CDATA[I was integrating a 2D Unity game into a larger project, that was using Raycast to detect what object in the screen the user was clicking on, and the app had the option “Queries Start In Colliders” disabled (in Project Settings&gt;Physics 2D). With this setting disabled colliders don’t work, so following recomendations in the forums, I had to change the implementation to use Physics2D.OverlapPoint instead of Raycast.]]></summary></entry><entry><title type="html">Changing GUID for files and folders in Unity</title><link href="https://dcastares.github.io/2022/05/25/Changing-Unity-GUID-for-files-and-folders.html" rel="alternate" type="text/html" title="Changing GUID for files and folders in Unity" /><published>2022-05-25T00:00:00+00:00</published><updated>2022-05-25T00:00:00+00:00</updated><id>https://dcastares.github.io/2022/05/25/Changing-Unity-GUID-for-files-and-folders</id><content type="html" xml:base="https://dcastares.github.io/2022/05/25/Changing-Unity-GUID-for-files-and-folders.html"><![CDATA[<p>When you are integrating one project within another or moving scenes between projects, you cannot have the same GUID in two elements, so if you don’t change it, Unity will do it for you.</p>

<h2>What are GUIDs?</h2>

<p>In Unity, GUIDs are unique identifiers that are automatically assigned by the system to each file and folder. Those ids are written in each .meta file that Unity creates automatically for each file we add to our project.</p>

<h2>Why you should care about GUIDs? </h2>

<p>Let’s say you have scripts, sprites, prefabs, or any other Unity component that are beign used in entities in your scene, for example, you have a Game Object that is using an image asociated to the SpriteRenderer component, and a C# script in that same object. That object under the hood will look for the asset by GUID, so if you import that scene to another project, and Unity by any chance change the GUID because the original ones are in use, those references will be broken, or even worst, pointing to a different asset making it more complicated to identify.</p>

<h2>So, what can I do about it?</h2>

<p>Long story short, I was manually replacing GUIDs with Visual Studio Code in my project when I found this package from <a href="https://jeffjadulco.com/" target="_blank">Jeff Jadulco</a> that you can add to your project before the merge, and change all the GUIDs and references straight from the Unity’s UI.</p>

<p>You can add the package from the following git url in the package manager:</p>

<p>https://github.com/jeffjadulco/unity-guid-regenerator.git</p>

<p>After that, right click in your project files and just select “Regenerate GUIDS”.</p>

<p>One thing to take into account, is that in order for this to work (either using the Jeff’s package or doing it manually), you need to have your assets serialized. This is done in Project Settings &gt; Editor &gt; Asset Serialization &gt; Mode: “Force Text”.</p>

<p>Thank you Jeff!</p>

<p><a target="_blank" href="https://github.com/jeffjadulco/unity-guid-regenerator">You can get the package here</a> and it’s well documented on how it works and how to use it.</p>

<p>If you have a comment, a question or a way to improve it, shoot me an email!</p>]]></content><author><name>Diego Castares</name></author><category term="Other" /><summary type="html"><![CDATA[When you are integrating one project within another or moving scenes between projects, you cannot have the same GUID in two elements, so if you don’t change it, Unity will do it for you.]]></summary></entry><entry><title type="html">Moving the camera with two finger touch in Unity</title><link href="https://dcastares.github.io/2022/04/29/Moving-2D-camera-with-two-finger-touch-or-mouse.html" rel="alternate" type="text/html" title="Moving the camera with two finger touch in Unity" /><published>2022-04-29T00:00:00+00:00</published><updated>2022-04-29T00:00:00+00:00</updated><id>https://dcastares.github.io/2022/04/29/Moving-2D-camera-with-two-finger-touch-or-mouse</id><content type="html" xml:base="https://dcastares.github.io/2022/04/29/Moving-2D-camera-with-two-finger-touch-or-mouse.html"><![CDATA[<p>I needed to let the user navigate a map using two fingers in devices, so I wrote this class you can attach to your camera in any 2D game. Also works with the mouse’s right button so you can test it out in the editor.</p>

<pre><code class="language-csharp">using UnityEngine;

public class CameraControllerBuilder : CameraController
{
    [SerializeField] private float topEdge;
    [SerializeField] private float bottomEdge;
    [SerializeField] private float leftEdge;
    [SerializeField] private float rightEdge;

    private bool isDragging = false;
    private Vector3 startCameraPosition;
    private Vector3 startMousePosition;
    private Vector3 newMousePosition;
    new void Start()
    {
        base.Start();   
    }

    void Update()
    {
        if (Input.GetMouseButton(1) || (Input.touchCount == 2))
        {
            newMousePosition = Camera.main.ScreenToWorldPoint(Input.mousePosition);
            if (isDragging)
            {
                transform.position = startCameraPosition + startMousePosition - newMousePosition;
                if (transform.position.x &lt; leftEdge || transform.position.x &gt; rightEdge)
                    transform.position = new Vector3(startCameraPosition.x, transform.position.y, transform.position.z);
                if (transform.position.y &lt; bottomEdge || transform.position.y &gt; topEdge)
                    transform.position = new Vector3(transform.position.x, startCameraPosition.y, transform.position.z);
            }
            else
                isDragging = true;
            SavePositions();
        }
        else if(isDragging)
        {
            isDragging = false;
        }
    }

    private void SavePositions()
    {
        startCameraPosition = transform.position;
        startMousePosition = Camera.main.ScreenToWorldPoint(Input.mousePosition);
    }
}
</code></pre>

<p>If you have a comment, a question or a way to improve it, shoot me an email!</p>]]></content><author><name>Diego Castares</name></author><category term="Other" /><summary type="html"><![CDATA[I needed to let the user navigate a map using two fingers in devices, so I wrote this class you can attach to your camera in any 2D game. Also works with the mouse’s right button so you can test it out in the editor.]]></summary></entry></feed>